 Pb28
Pb28 PHP Import Excel File into MySQL Database with PhpSpreadsheet
Importing Excel data into MySQL is a common requirement in admin panels, internal tools, and bulk data upload screens. In PHP, the most practical way to do this is to upload the Excel file, read it with PhpSpreadsheet, validate each row, and insert the data into MySQL using prepared statements.
In this tutorial, I will show a simple working example that imports an Excel file into a MySQL table using plain PHP and MySQLi. The demo accepts .xlsx and .xls files, skips the header row, validates important fields, and shows the imported rows after processing.
Quick Answer
To import an Excel file into MySQL using PHP:
- Upload the Excel file using a regular HTML form.
- Read the workbook with PhpSpreadsheet.
- Loop through the worksheet rows.
- Validate the required columns.
- Insert the data into MySQL with MySQLi prepared statements.
That is the full flow we will build in this example.
What this example covers
- Excel file upload with PHP
- Reading
.xlsxand.xlsfiles - Skipping the heading row
- Basic row validation
- MySQL insert using prepared statements
- Showing import success, skipped rows, and latest imported records
Before you start
This example uses:
- PHP 8+
- MySQL
- MySQLi
- PhpSpreadsheet
If you are new to handling uploads in PHP, you may also like this related guide on uploading files using PHP. Since this tutorial inserts user-provided data into a database, using prepared statements is important.
In the next section, we will create the database table and look at the project structure.
Database table
For this tutorial, we will import Excel rows into a simple tbl_users table. It stores the user’s name, email, phone, and created date.
CREATE TABLE `tbl_users` (

  `id` INT NOT NULL AUTO_INCREMENT,

  `name` VARCHAR(100) NOT NULL,

  `email` VARCHAR(150) NOT NULL,

  `phone` VARCHAR(30) DEFAULT NULL,

  `created_at` TIMESTAMP NOT NULL DEFAULT CURRENT_TIMESTAMP,

  PRIMARY KEY (`id`),

  UNIQUE KEY `uniq_email` (`email`)

) ENGINE=InnoDB DEFAULT CHARSET=utf8mb4;
The unique email key is useful here. It prevents duplicate email entries during repeated imports. In a real project, you can adjust the columns based on your Excel format.
Project structure
The downloadable project keeps the file structure small and easy to follow.
excel-import-project/

│── config.php

│── index.php

│── import.php

│── list.php

│── schema.sql

│── composer.json

│── README.md

│── uploads/

└── sample/

└── sample-users.xlsxconfig.phpcontains the database connection.index.phpshows the upload form and result messages.import.phpvalidates the uploaded file, reads the Excel sheet, and inserts rows into MySQL.list.phpdisplays the latest imported records.schema.sqlcreates the database table.sample-users.xlsxgives you a ready test file.
Install PhpSpreadsheet
This tutorial uses PhpSpreadsheet to read the Excel file. Install it with Composer inside your project folder.
composer require phpoffice/phpspreadsheetAfter installation, your project will include Composer’s vendor/autoload.php file. We will use that to load the library in the import script.
Sample Excel format
The Excel file used in this tutorial contains one header row and then the actual data rows.
Name | Email | Phone

John Doe | john@example.com | 9876543210

Jane Smith | jane@example.com | 9123456780
We will treat the first row as the heading row and skip it during import.
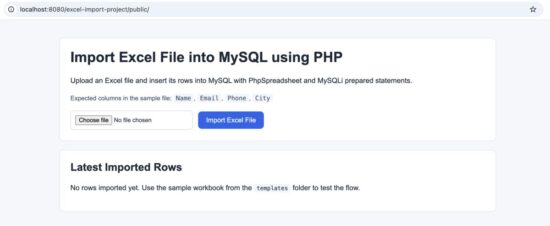
Sample Excel sheet used for PHP MySQL import
In the next section, we will create the database connection file and then build the upload form.
Create the database connection
Start with a small configuration file for the MySQL connection. This keeps the database code separate and easier to reuse.
<?php

declare(strict_types=1);


$host = 'localhost';

$dbname = 'test';

$username = 'root';

$password = '';


$mysqli = new mysqli($host, $username, $password, $dbname);


if ($mysqli->connect_error) {

    die('Database connection failed: ' . $mysqli->connect_error);

}


$mysqli->set_charset('utf8mb4');
Save this as config.php.
Create the upload form
Next, create the main page with a simple file upload form. This page also shows success and error messages after the import is complete.
<?php

declare(strict_types=1);


$successMessage = $_GET['success'] ?? '';

$errorMessage = $_GET['error'] ?? '';

?>

<!doctype html>

<html lang="en">

<head>

    <meta charset="utf-8">

    <meta name="viewport" content="width=device-width, initial-scale=1">

    <title>Import Excel File into MySQL</title>

    <link rel="stylesheet" href="assets/style.css">

</head>

<body>

    <div class="page-wrap">

        <h1>Import Excel File into MySQL</h1>

        <p>Upload an Excel file in XLS or XLSX format and import the rows into the database.</p>


        <?php if ($successMessage !== '') { ?>

            <div class="alert success"><?= htmlspecialchars($successMessage) ?></div>

        <?php } ?>


        <?php if ($errorMessage !== '') { ?>

            <div class="alert error"><?= htmlspecialchars($errorMessage) ?></div>

        <?php } ?>


        <form action="import.php" method="post" enctype="multipart/form-data" class="import-form">

            <label for="excel_file">Choose Excel file</label>

            <input type="file" name="excel_file" id="excel_file" accept=".xls,.xlsx" required>


            <button type="submit" name="import">Import Data</button>

        </form>


        <p class="helper-text">Accepted file types: .xls, .xlsx</p>


        <p><a href="list.php">View imported records</a></p>

    </div>

</body>

</html>
This form is intentionally simple. The user selects the Excel file and submits it to import.php.
Add light CSS for a clean demo UI
The topic here is the import logic, not the design. Still, a small amount of CSS makes the demo easier to read and better for screenshots.
body {

    font-family: Arial, sans-serif;

    background: #f5f7fb;

    color: #222;

    margin: 0;

    padding: 40px 20px;

}


.page-wrap {

    max-width: 720px;

    margin: 0 auto;

    background: #fff;

    padding: 24px;

    border: 1px solid #d9e0ea;

    border-radius: 8px;

}


h1 {

    margin-top: 0;

    font-size: 28px;

}


p {

    line-height: 1.6;

}


.import-form {

    margin-top: 20px;

}


label {

    display: block;

    font-weight: 700;

    margin-bottom: 8px;

}


input[type="file"] {

    display: block;

    width: 100%;

    max-width: 100%;

    padding: 10px;

    border: 1px solid #c8d2df;

    background: #fff;

    box-sizing: border-box;

}


button {

    margin-top: 16px;

    background: #1565c0;

    color: #fff;

    border: none;

    padding: 11px 18px;

    border-radius: 4px;

    cursor: pointer;

    font-size: 15px;

}


button:hover {

    background: #0f4fa0;

}


.alert {

    margin: 16px 0;

    padding: 12px 14px;

    border-radius: 4px;

}


.success {

    background: #edf7ed;

    color: #1b5e20;

    border: 1px solid #c8e6c9;

}


.error {

    background: #fdecec;

    color: #b71c1c;

    border: 1px solid #f5c6c6;

}


.helper-text {

    color: #555;

    font-size: 14px;

}
If you want a broader look at upload handling in PHP, this related Pb28 Master guide on file upload using PHP is also useful.
In the next section, we will write the import logic that validates the file, reads the spreadsheet, and inserts the rows into MySQL.
Import Excel data into MySQL using PHP
Now let us build the main import script. This file will:
- check whether a file was uploaded
- validate the extension
- move the uploaded file to a safe folder
- read the Excel sheet using PhpSpreadsheet
- skip the first row
- validate each data row
- insert valid rows into MySQL using a prepared statement
Create import.php with the following code.
<?php

declare(strict_types=1);


require __DIR__ . '/config.php';

require __DIR__ . '/vendor/autoload.php';


use PhpOffice\PhpSpreadsheet\IOFactory;


if ($_SERVER['REQUEST_METHOD'] !== 'POST') {

    header('Location: index.php');

    exit;

}


if (!isset($_FILES['excel_file']) || $_FILES['excel_file']['error'] !== UPLOAD_ERR_OK) {

    header('Location: index.php?error=' . urlencode('Please choose a valid Excel file.'));

    exit;

}


$uploadedFile = $_FILES['excel_file'];

$originalName = $uploadedFile['name'] ?? '';

$tmpName = $uploadedFile['tmp_name'] ?? '';


$extension = strtolower(pathinfo($originalName, PATHINFO_EXTENSION));

$allowedExtensions = ['xls', 'xlsx'];


if (!in_array($extension, $allowedExtensions, true)) {

    header('Location: index.php?error=' . urlencode('Only XLS and XLSX files are allowed.'));

    exit;

}


$uploadDir = __DIR__ . '/uploads/';

if (!is_dir($uploadDir)) {

    mkdir($uploadDir, 0775, true);

}


$safeFileName = 'import_' . date('Ymd_His') . '_' . bin2hex(random_bytes(4)) . '.' . $extension;

$destination = $uploadDir . $safeFileName;


if (!move_uploaded_file($tmpName, $destination)) {

    header('Location: index.php?error=' . urlencode('Failed to move the uploaded file.'));

    exit;

}


try {

    $reader = IOFactory::createReaderForFile($destination);

    $reader->setReadDataOnly(true);

    $spreadsheet = $reader->load($destination);

    $worksheet = $spreadsheet->getActiveSheet();

    $rows = $worksheet->toArray();

} catch (Throwable $e) {

    header('Location: index.php?error=' . urlencode('Unable to read the Excel file.'));

    exit;

}


if (count($rows) <= 1) {

    header('Location: index.php?error=' . urlencode('The Excel file does not contain data rows.'));

    exit;

}


$sql = "INSERT INTO tbl_users (name, email, phone) VALUES (?, ?, ?)";

$stmt = $mysqli->prepare($sql);


if (!$stmt) {

    header('Location: index.php?error=' . urlencode('Failed to prepare the database query.'));

    exit;

}


$importedCount = 0;

$skippedCount = 0;


foreach ($rows as $index => $row) {

    if ($index === 0) {

        continue;

    }


    $name = trim((string) ($row[0] ?? ''));

    $email = trim((string) ($row[1] ?? ''));

    $phone = trim((string) ($row[2] ?? ''));


    if ($name === '' && $email === '' && $phone === '') {

        continue;

    }


    if ($name === '' || $email === '') {

        $skippedCount++;

        continue;

    }


    if (!filter_var($email, FILTER_VALIDATE_EMAIL)) {

        $skippedCount++;

        continue;

    }


    $stmt->bind_param('sss', $name, $email, $phone);


    if ($stmt->execute()) {

        $importedCount++;

    } else {

        $skippedCount++;

    }

}


$stmt->close();


$message = "Import completed. Imported: {$importedCount}. Skipped: {$skippedCount}.";

header('Location: index.php?success=' . urlencode($message));

exit;
How this import script works
This script is small, but it does the important work in the right order.
- It accepts only
.xlsand.xlsxfiles. - It stores the uploaded file with a generated filename instead of trusting the original filename.
- It reads the sheet using
IOFactory, which is the standard approach recommended in PhpSpreadsheet documentation. - It skips the first row because that row contains column headings.
- It validates required values before inserting.
- It uses a prepared statement, which is safer than building raw SQL strings.
The script uses only the active sheet. That fits the likely search intent for this topic, which is a simple and practical Excel import example.
Why prepared statements matter here
Even though the data comes from an Excel file, you should still treat it as untrusted input. A spreadsheet can contain bad values, malformed text, or unexpected characters. Prepared statements help you insert data safely and cleanly.
For a deeper explanation, see this Pb28 Master guide on preventing SQL injection in PHP.
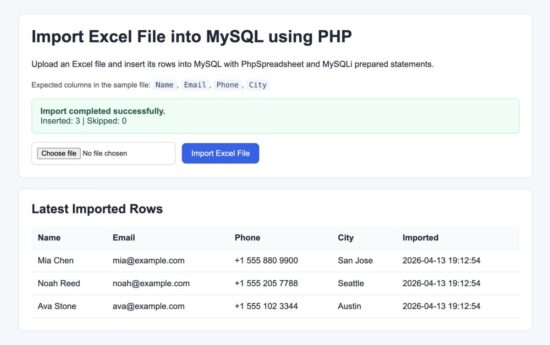
Excel import success message in PHP and MySQL example
In the next section, we will display the imported database records and then cover the key security points and common errors.
Show the imported records
After importing the Excel file, it is helpful to show the inserted rows. This gives quick confirmation that the import worked as expected.
Create list.php with the following code.
<?php

declare(strict_types=1);


require __DIR__ . '/config.php';


$result = $mysqli->query("SELECT id, name, email, phone, created_at FROM tbl_users ORDER BY id DESC LIMIT 50");

?>

<!doctype html>

<html lang="en">

<head>

    <meta charset="utf-8">

    <meta name="viewport" content="width=device-width, initial-scale=1">

    <title>Imported Records</title>

    <link rel="stylesheet" href="assets/style.css">

</head>

<body>

    <div class="page-wrap">

        <h1>Imported Records</h1>

        <p><a href="index.php">Back to import form</a></p>


        <?php if ($result && $result->num_rows > 0) { ?>

            <div class="table-wrap">

                <table class="data-table">

                    <thead>

                        <tr>

                            <th>ID</th>

                            <th>Name</th>

                            <th>Email</th>

                            <th>Phone</th>

                            <th>Created</th>

                        </tr>

                    </thead>

                    <tbody>

                        <?php while ($row = $result->fetch_assoc()) { ?>

                            <tr>

                                <td><?= (int) $row['id'] ?></td>

                                <td><?= htmlspecialchars($row['name']) ?></td>

                                <td><?= htmlspecialchars($row['email']) ?></td>

                                <td><?= htmlspecialchars((string) $row['phone']) ?></td>

                                <td><?= htmlspecialchars($row['created_at']) ?></td>

                            </tr>

                        <?php } ?>

                    </tbody>

                </table>

            </div>

        <?php } else { ?>

            <div class="alert error">No records found.</div>

        <?php } ?>

    </div>

</body>

</html>
Add these extra styles to the same CSS file.
.table-wrap {

    overflow-x: auto;

    margin-top: 20px;

}


.data-table {

    width: 100%;

    border-collapse: collapse;

    background: #fff;

}


.data-table th,

.data-table td {

    border: 1px solid #d9e0ea;

    padding: 10px 12px;

    text-align: left;

    vertical-align: top;

}


.data-table th {

    background: #f1f5f9;

    font-weight: 700;

}
Security considerations
This tutorial is simple, but a few security checks matter.
- Do not trust the uploaded file type alone. Checking the extension is useful, but for stricter validation you can also inspect the MIME type and handle upload errors carefully.
- Treat spreadsheet data as untrusted input. Excel content may still contain invalid or unexpected values. Always validate required fields before inserting into MySQL.
- Use prepared statements. This protects the insert query from unsafe input and keeps the SQL clean.
- Store uploads outside the public web root in production. In this demo, the upload folder is kept simple. For a real project, it is better to store uploaded files in a safer location.
- Limit file size. Large spreadsheets can consume memory and slow down imports. Set practical upload limits for your use case.
If you need more background on safe upload handling, read the PHP manual page for handling file uploads.
Common errors and fixes
- Composer autoload file not found
Runcomposer require phpoffice/phpspreadsheetin the project folder and make sure thevendordirectory exists. - The file uploads but nothing is imported
Check whether the Excel sheet uses the expected column order: name, email, phone. Also confirm that the first row is only the header row. - Some rows are skipped
This example skips rows with missing name, missing email, or invalid email format. That behavior is intentional. - Duplicate entry error for email
The table uses a unique key on the email column. If the same email already exists, that row will fail and be counted as skipped. - Permission denied on uploads folder
Make sure PHP can create and write to theuploadsdirectory on your local server.
In the next section, we will add a short developer FAQ and then finish with the download section.
Developer FAQ
Can I import both XLS and XLSX files?
Yes. This example accepts both .xls and .xlsx files. PhpSpreadsheet can read both formats.
Can I import Excel data into another table structure?
Yes. You can change the table columns and then update the column mapping in import.php. Just make sure the Excel column order matches your PHP import logic.
Can I update existing rows instead of skipping duplicates?
Yes. In that case, you can use a different SQL approach such as INSERT ... ON DUPLICATE KEY UPDATE. That is useful when you want the Excel file to refresh existing records instead of only adding new ones.
Can I import multiple sheets from the same workbook?
Yes, but this tutorial keeps things simple and reads only the active sheet. If your workbook has multiple sheets, you can loop through them using PhpSpreadsheet and process each one based on your project rules.
What is the best library for importing Excel files in PHP?
For modern PHP projects, PhpSpreadsheet is the most practical choice. It supports reading Excel files well and is widely used.
Should I use AJAX for Excel import?
You can, but it is not required for the core task. A normal form post is easier to understand and is enough for many admin-side import tools.
Download the source code
The full working example used in this tutorial is available as a downloadable project zip.
Download the source code
The download package includes:
- upload form
- import script
- database schema
- record listing page
- sample Excel file
- setup instructions
If you also need the reverse flow, Pb28 Master has a related tutorial on exporting data to Excel in PHP.
Conclusion
Importing an Excel file into MySQL using PHP is straightforward when you break it into small steps. Upload the file, read it with PhpSpreadsheet, validate each row, and insert the cleaned data into MySQL using prepared statements.
This example keeps the flow simple, which makes it a good starting point for intermediate PHP developers. From here, you can extend it with duplicate handling, better validation, column mapping, preview before import, or background processing for large files.